Wednesday, December 31, 2008

Robocopy error: ERROR 5 (0x00000005) Changing File Attributes

I use robocopy to backup my files to a network drive with the following command:

robocopy [source folder] [target folder] /MIR

The MIR option will create the target folder as a mirror of the source folder. The command above works pretty well when both source and target folder are NTFS file systems.

When I changed the target folder to my DNS-323 network storage, which uses a Linux file system (ext2/ext3), I started getting the following errors with the command above:
  • Although some files are virtually identical in both content and timestamp, robocopy still thinks they are different and show them as "Newer". So, whenever you run the command above, robocopy will always copy these files even if they did not change (not good for incremental backups!).
  • "ERROR 5 (0x00000005) Changing File Attributes ... Access is denied".
For the first error, you need to use the /FFT flag to assume FAT file times (2 second granularity). Although the target folder is ext2/ext3, these file systems also implement file times with 2 second granularity.

For the second error (ERROR 5), you need to turn off the attribute copying. Robocopy uses the /COPY:DAT by default, which means to copy data, attributes and timestamp. You should turn off attribute copying by explicit setting /COPY:DT.

So, the command to backup from a NTFS partition to a ext2/ext3 partition should be:

robocopy [source folder] [target folder] /MIR /COPY:DT /FFT

Monday, December 29, 2008

Upgrading to SQL Server 2008 Express and Management Studio Express 2008

In my developer machine, I have Visual Studio 2008 Professional which comes with SQL Server Express 2005. I decided to upgrade to SQL Server Express 2008 and also use the new Management Studio Express 2008.

For the 2005 versions, we have two separate installers: one for SQL Express and another one for Management Studio Express. For the 2008 version, these products are deployed in the same installer: Microsoft SQL Server 2008 Express with Tools. Lots of people are complaining that they cannot get the Management Studio installed (see discussion here), but the trick is to run the installer twice: first run to upgrade to SQL Express 2008, and the second run to add features to the current installation (Management Tools - Basic). The main steps of this installation are:

1. Download the installer from Microsoft SQL Server 2008 Express with Tools and run it.

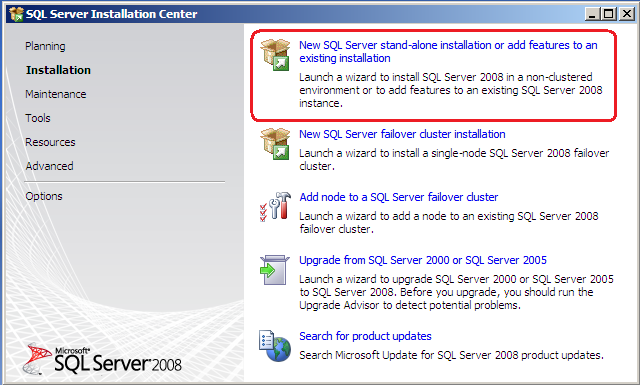
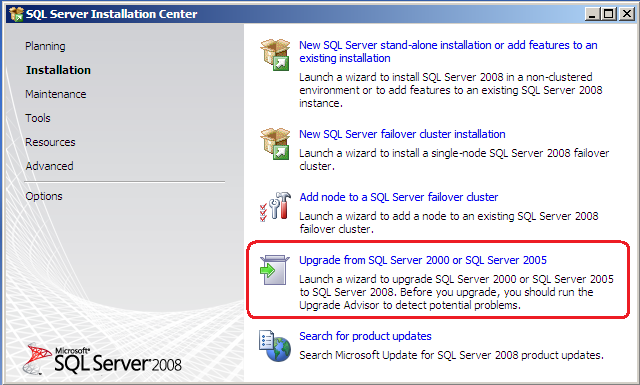
2. In the Installation screen, select Upgrade from SQL Server 2000 or SQL Server 2005, and just follow the next screens. During the upgrade, it is not possible to select new features to be added (Management Tools), so you will have to run this installer again later to add the management tools.


3. After the installation is completed, close the SQL Server Installation Center if it is still open. Then run again the same installer that you downloaded on step 1, in my case SQLEXPRWT_x86_ENU.exe.

4. In the Installation screen, select New SQL Server stand-alonegrade from SQL Server 2000 or SQL Server 2005, and just follow the next screens.


5. In the SQL Server 2008 Setup - Installation Type screen, select Add features to an existing instance of SQL Server 2008, and click on Next.


6. In the SQL Server 2008 Setup - Feature Selection screen, select Management Tools - Basic, and click on Next, and just follow all the remaining screens.


When installation finishes, you will be able to access Microsoft SQL Server Management Studio from Start/Programs/Microsoft SQL Server 2008 menu, or by just running ssms.exe.

During the installation, the Setup Support Rules screen showed all the time. I understand their concern to verify that we meet all the installation requirements, but they should show this screen only if we fail in meeting some requirements, otherwise it becomes annoying.

Tuesday, December 23, 2008

Team Foundation Server Power Tools

I work on some open source projects in Codeplex (Repository Factory and Chinook Database) and I've been using Visual Studio Team Explorer to access the source code repository in their Team Foundation Server.

Although TortoiseSVN is my favorite client, and I could use it through SVNBridge, I am still insisting in using VS Team Explorer just to get used to a different tool. One of the things I miss on it is the ability to undo files that were not changed. Perforce, another source code control that I used for many years, has this feature to undo unchanged files. This feature is important so that you only check in files that you modify, thus avoiding having unchanged files in your change list that would waste time of your reviewers!! If it is a small change set, it is not a big deal to manually undo them. When I was converting some projects from VS 2005 to 2008, I had to open for edit all files before initiating the conversion, otherwise it would fail. Most of the files did not change, and it became impractical to manually undo them due to the large number of files involved.

After a few searches, I found Team Foundation Server Power Tools which consists of a set of enhancements, tools and command-line utilities that improve the Team Foundation Server user experience. It requires you to have Windows PowerShell installed. One of the tools included is the command line utility tfpt.exe which provides the following commands:


In order to undo unchanged files in your workspace, you need to use the following command:
   tfpt uu
This command will list all unchanged files and then prompt you if you really want to undo them. It worked really well for me and saved me lots of time!

Besides the tfpt.exe command line tool, Team Foundation Power Tools also includes:
  • TFS Best Practices Analyzer
  • Process Template Editor
  • Work Item Templates
  • Custom check-in policies
  • TFS Server Manager
  • TFS Users tool
  • Alert Editor

Tuesday, December 16, 2008

patterns & practices Application Architecture Guide 2.0 - Community Technology Preview (CTP)

The Patterns and Practices team just released the Community Technology Preview (CTP) of Application Architecture Guide 2.0. This guide provides design-level guidance for the architecture and design of applications built on the .NET Framework. This is a CTP, and the release of this guidance in the MSDN Library is currently scheduled for February 2009.

Monday, December 08, 2008

Home, PageUp, PageDown and arrow keys not working inside VMware virtual machine

When running my Windows XP Pro 32-bit virtual machine on my Ubuntu 8.10 64-bit host, several keys are not working properly, including: Home, PageUp, PageDown, End, arrow keys, etc.

This virtual machine works fine when the host is Windows Vista 32-bit. This looks like a common issue when running vmware on Ubuntu 8.10. Thanks to this post which provided a simple solution for this annoying problem. In your Ubuntu host, edit the file /etc/vmware/config, and add the following line:
xkeymap.nokeycodeMap = true
This worked out for me! For more info see the original post.

Wednesday, November 19, 2008

Beta Exam 71-505: TS: Microsoft .NET Framework 3.5, Windows Forms Application Development

As mentioned on this post, some exams of the Microsoft Certified Professional Developer certification, aka MCPD for .NET 3.5, are on beta. The new Windows Form exam (70-505) will have a beta version available for registration as of 11/21/2008. See the information at:
You can register for this beta exam for free (normal cost is 125 USD), and if you pass on it, the exam credit will be added to your transcript and you will not need to take the exam in its released form.

So hurry up, because seats are limited. First-come, first-serve!

For more information about beta certification exams, see Beta Exams Announcements Blog, and also Gerry O'Brien Blog.

Sunday, November 16, 2008

Shrinking the Capacity of a VMware Virtual Disk

I've being using my VMware images with virtual disks that allocate the space as needed, e.g. growable disks. VMware says that if you allocate the full capacity of the virtual disk, you will enhance the performance of your virtual machine. Since I have lots of space on my HD, I decided to convert my virtual disks from growable to preallocated type to enhance virtual machine performance. To do that, you just need to use the vmware-vdiskmanager.exe tool, for example:
vmware-vdiskmanager -r old_disk.vmdk -t 2 new_disk.vmdk
It is pretty simple, but I also want to reduce the virtual disk capacity at the same time. The original capacity was 40 GiB, and I would like to reduce it to 28 GiB. It turns out that this is not something you can do with a simple command line. I thought I could just add the -s option to the command above, but this option is not valid with the convert option (-r), only when creating a new virtual disk.

I thought about using the shrink option (-k), but this option is not to shrink the virtual disk capacity, it is only for reducing the size of the vmdk file itself that was created with the growable option. The virtual disk capacity stays the same. If you actually want to reduce the capacity of your virtual disk, then you will need to:
  • Create a new virtual disk with the desirable capacity. You can do this by either using VMware Server or Workstation GUI or using the vmware-vdiskmanager tool. For example, in my case:
      vmware-vdiskmanager -c -t 2 -s 28GB -a ide new_disk.vmdk
  • Add your new virtual disk to your virtual machine. In VMware Server, you click on Virtual Machine Settings, select Hard Disk, and then click on Add.
  • Shrink the logical partition of your existing virtual disk to fit on the new virtual disk. You can use GParted for this as described here.
  • Copy your logical partition from the original to the new virtual disk. You can also use GParted for this as described here. If you are copying a boot partition, then it will require you an additional step. After you copied the logical partition to the new disk, you will need to add the boot flag to it. To do that, just right click on the partition, select Manage Flags, then check the boot option as shown below.
Although shrinking the capacity of a virtual disk involves lots of work, to expand the capacity is way simpler. You just need to use the expand option (-x) of the vmware-vdiskmanager tool, and it will add extra non formatted space to your virtual disk.

Wednesday, November 12, 2008

Microsoft SDL Threat Modeling Tool

Microsoft announced the new SDL Threat Modeling Tool during the Tech-Ed EMEA 2008. The Security Development Lifecycle (SDL) is a Microsoft methodology which consists of a series of best practices for software developers and architects to evaluate and consider security issues when designing a product.

The Microsoft SDL Threat Modeling Tool is part of the design phase of the SDL and allows software architects to identify and mitigate potential security issues early, when they are relatively easy and cost-effective to solve. With this tool, architects can communicate about the security design of their systems, analyze those designs for potential security issues and suggest and manage mitigations for security issues.

See a demo of the SDL Threat Modeling Tool v3 or download it from here.

Also, if you will be attending Edmonton Code Camp 2008 at the end of this month, David Woods will be doing a talk on Threat Modeling.

Tuesday, November 11, 2008

Splitting your VMware virtual disk into multiple files of 2 GB

When I created my VMware image, I used only one file for the entire virtual disk (vmdk file). If you want to split your single virtual disk file into multiple files, then you can use the virtual disk manager that comes with VMware. This tool is the vmware-vdiskmanager.exe located in the VMware installation directory.

If you want to split your current virtual disk file into multiple files, use one of the following commands:

1. For a growable virtual disk, use the following command to split into 2 GB:
vmware-vdiskmanager.exe -r old.vmdk -t 1 new.vmdk
or

2. For a preallocated virtual disk, use the following command to split in 2 GB:
vmware-vdiskmanager.exe -r old.vmdk -t 3 new.vmdk

Monday, November 10, 2008

Friday, November 07, 2008

MCPD .NET 3.5 Beta Exams

If you are planning to get the certification Microsoft Certified Professional Developer - MCPD for .NET 3.5, there are some exams that are on beta. You can register for these beta exams for free (normal cost is 125 USD), and if you pass on the beta exam, the exam credit will be added to your transcript and you will not need to take the exam in its released form.

The following are the MCPD beta exams currently available:
So hurry up, because seats are limited. First-come, first-serve!

For more information about beta certification exams, see Beta Exams Announcements Blog, and also Gerry O'Brien Blog.

Thursday, November 06, 2008

Free Silverlight Menu and Toolbar Control by DevExpress

In addition to a free Silverlight data grid control, DevExpress is releasing a free menu and toolbar controls for Silverlight, the AgMenu Suite. It is free of charge and you can also download the source code.

See the links below for more information about these free controls:

Monday, November 03, 2008

Edmonton Code Camp 2008 - Comming on November 29th

The Edmonton Code Camp 2008 is a one-day developer conference driven by the local developer community. This year, it will be on Saturday, November 29th at:

Grant MacEwan College
Building #5, Downtown Campus (map)
Edmonton, AB

I attended this event last year and I was impressed with the organization and quality of presentations. This event is completely free and topics are based on community interest. See more details here. Do not miss it, it is highly recommended!

Patrick Smacchia's advices on starting your ISV

Patrick Smacchia is a the lead developer of the tool NDepend for code analysis and metrics. See his advices to developers on starting their own Independent Software Vendor business.

Friday, October 31, 2008

Installing VMware Player in Ubuntu

A while ago I posted how to install VMware player in Ubuntu 7.10. Today, I upgraded to Ubuntu 8.10 and needed to reinstall the latest VMware, version 2.5.

Things are now way easier, since VMware player is available as a bundle file. After you download the bundle file from VMware, then you can just run the following command in the terminal window:

sudo sh VMware-Player-2.5.0-118166.x86_64.bundle

It is pretty simple, eh? No need to extract the tar file and answer all those questions. Enjoy it!

Thursday, October 30, 2008

Ubuntu 8.10 released today!

Canonical Ltd. released today Ubuntu 8.10 which comes with new cool features such as the 3G network support. You will be able to use your 3G cellphone network to connect your laptop to the Internet. The new features include:
  • 3G Network support.
  • Write Ubuntu to and Install from a USB Drive: Ubuntu will allow users to write Ubuntu to a USB drive, even a modified version of Ubuntu with their data on it, so it can be carried everywhere to plug in and use on any machine.
  • Guest Sessions: guest sessions allow users to lock down a session easily so a guest can use the full system without interference with programs or data.
  • BBC Content available through Ubuntu default media players.
If you are installing it on a new machine, then you can download it from here. Or if you are upgrading from 8.04, then you can just upgrade through the network, by following the instructions from here.

Tuesday, October 28, 2008

Visual Studio 2010 and .NET Framework 4.0 CTP Feedback

Microsoft Visual Studio 2010, Visual Studio Team System 2010 and .NET Framework 4.0 Community Technology Preview (CTP) are available to download and install from here.

Thursday, October 16, 2008

Using TortoiseSVN with CodePlex

This is not new but I just realized today that CodePlex supports TortoiseSVN. I've been using Subversion for my home projects with TortoiseSVN and VisualSVN (a plug-in for Visual Studio).
This does not mean that Codeplex is using Subvesion as repository. They are still using Team Foundation Server as repository, but they added support for SvnBrigde, a tool that allows Subersion clients to connect to Team Foundation Server.

So far, I've been using Visual Studio Team Explorer with Codeplex projects. Team Explorer is an open source client for Team Foundation Server. It works fine, but I rather using TortoiseSVN/VisualSVN.

Wednesday, October 15, 2008

TechDays Canada 2008

Unfortunately I will not be attending PDC this year, but Microsoft is organizing TechDays Canada 2008. Of course it is not the same thing, but it is still an interesting event for Canadian developers. It is a 2 day event with tracks for developers and IT folks, see the sessions info here.

They will have in Vancouver, Calgary, Winnipeg, Toronto, Ottawa, Montreal, and Halifax. Too bad they do not have in my hometown Edmonton, but I can just drive south to Calgary.

The early bird registration, until October 29th, is $249.99 for the two days event. It is pretty cheap and you will still get free Visual Studio 2008 Professional, MS Expression Web 2, TechEd 2008 DVD Set, and 30% off Certification voucher.

If you are a .NET developer living in Canada, do not miss this.

I hope to see you there in Calgary on December 10 & 11.

Saturday, September 06, 2008

Microsoft Exam 70-536

I passed on the Microsoft exam 70-536 yesterday and I would like to share my experiences on it. The test consisted of 40 questions. The format is similar to the practice exam of the text book.

The exam has some annoyances. For example, the UI is still from the 20th century: it looks like an old Win32 application and the mouse wheel does not work! There is a big delay when going from one question to the next one. This happens because the current answer is saved on the exam server, so that data can be recovered in the case of a power loss. It is good to save it to the server, but this delay takes from 30 seconds to one minute!! Not sure if this is a Prometric problem or just on that specific test center. Although there is this delay, the exam timer is paused when moving from one question to the other.

When I finished answering all questions, I still had about 25 minutes to review. This is when things started not going well. During the review mode, the exam timer does not pause while moving from one question to the next one. So, I was wasting about a minute by clicking on Next and waiting for the next question to show!! Also, when the exam prompts a message reminding you that you have 5 minutes left, the buttons at the bottom of the screen (Next, Previous and Review) disappear. So, I got stuck on that screen and couldn't move to another question or even finish my exam. I tried to get help from the staff there, but the exam timed out and it didn't show anything for me, the screen was blank for a few minutes and it moved directly to the customer satisfaction survey. I did not know if I pass or fail, and I was afraid that I lost everything. After some minutes of panic, the exam administrator came and told me that the score report was printed properly and I passed!!

I reported these problems, and they told me that the 5 minutes reminder bug is an old issue that was apparently over but came back in the last few weeks. My advice is to spend more time answering your questions during the first pass (exam timer pauses while saving) rather than spending time reviewing them (exam timer does not pause while saving).
Also, finish your exam before the 5 minutes reminder buggy message appears, just to make sure that it finishes properly by showing your score/result on the screen.

Friday, September 05, 2008

How I added the words Oracle and MySQL to the SQL Server Developer website

No, I am not a hacker or either have access to the source of SQL Server Developer page. I just created a project in Codeplex, the Chinook Database, and tagged it with SQL Server. The SQL Server Developer page has a section at the bottom with recent SQL Server projects, and my new project is displayed there.

The result: the SQL Server Developer website has the words Oracle and MySQL!!


The Chinook Database project description contains the supported databases, and they all show on the SQL Server Developer page. Sorry Microsoft, this was not intentional but it was funny to accidently have the words Oracle and MySQL in SQL Server website.

Sunday, August 17, 2008

Chinook Sample Database is Alive!

During the past two weeks, I've been working on a sample database in order to test ORM tools and make a quick demos. The idea is to have a simple database that can be created by a single script, and provide versions of this script for more than one database server: SQL Server, Oracle and MySQL.

With this idea in mind, I created the Chinook Database in Codeplex. Its first release is available here. I will be using it in order to create some tests for the other project I am working on, the Repository Factory, which supports SQL Server and Oracle. Having the same sample database for different servers, make testing the Repository Factory easier since unit tests can be common.

The Chinook Database represents a media store, digital media store, including tables for artists, albums, media tracks, invoices and customers. The media information was generated from my iTunes library file, but anyone can download its source code and use their own iTunes information. The sales information is random generated for a 4 years period.

I will be working on adding more customers to it. I just added a few so far, but with address that can be located by Google maps, and probably by other map engines. The idea is to have customers from different countries and address formats. So far, we only have for Canada, USA, and Brazil, but more to come.

I hope this database will be useful for other folks and I will keep updating it constantly.

Enjoy it!

Thursday, August 14, 2008

Saving your password and username in Visual Studio Team Explorer

I am using the Visual Studio Team Explorer to connect to the Codeplex Team Foundation Server (TFS). One of the things that annoys me is the fact that Team Explorer does not save your TFS credentials and then prompts you all the time with the window below whenever you reopen Visual Studio.


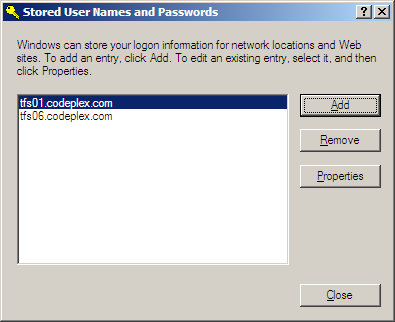
Although Team Explorer does not save your credentials, you can store your username and password for your TFS through your Windows XP/Vista account. To do that, go to Control Panel, User Accounts and select your account. Click on Manage network passwords link.

On the Stored User Names and Passwords window, click on Add to enter your credential information to be persisted.


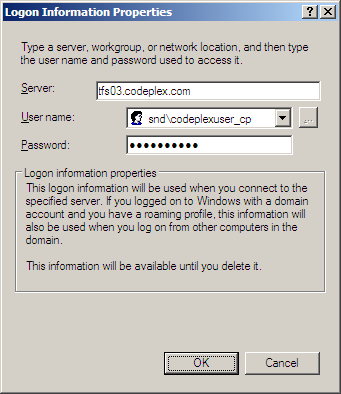
Then, just enter the Team Foundation Server you are using, plus your username and password:


That is, Visual Studio Team Explorer will never prompt you again for these credentials since they are stored with your Windows user. The steps and screen shots above are for Windows XP, but they are very similar in Windows Vista.

Sunday, August 10, 2008

Second Shot Offer for Microsoft Certification Exams

The Microsoft exam Second Shot offer is available again. If you are planning to take a Microsoft certification exam, you should use this Second Shot Exam Offer. If you don't pass on your first attempt, then you can take a second attempt for free.

During the registration of your first attempt exam, you will need to apply the second shot voucher. You can get a second shot voucher from here. If you fail on your first attempt exam, then you can register for the same exam for free by using your second shot voucher.

Wednesday, July 30, 2008

How to Debug a Guidance Package

When I started working on the Repository Factory project, one of the hardest things was how to debug it. Repository Factory is an GAT Guidance Package, which extends Visual Studio by providing additional functionality. Since it is executed by Visual Studio, how could I possibly debug it?

It turned out that it is not that difficult. You will basically need two instances of Visual Studio, one with the Guidance Package to be debugged, and the other one with a solution that uses the Guidance Package.

I used the following steps to debug the Repository Factory, but they can be applied to any Guidance Package:

1. Open an instance of Visual Studio and open the solution file of your Guidance Package.

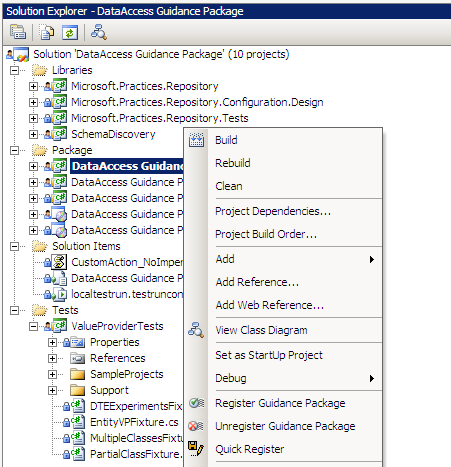
2. Locate your Guidance Package Project on the Solution Explorer, right click on it, set it as a Start Up Project, and open the Properties window.

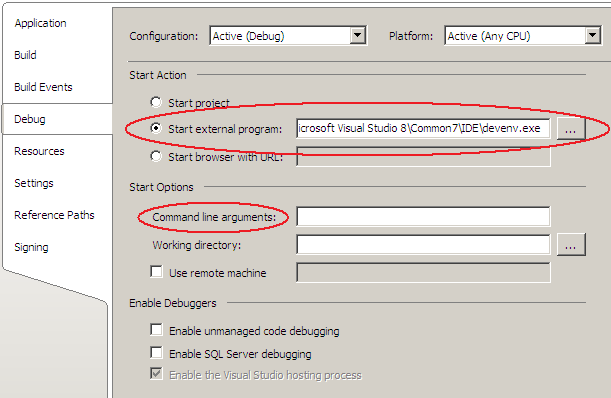
3. On the Properties window, click on the Debug tab, select Start external program and enter the location of Visual Studio, e.g. devenv.exe. Optionally, you can also specify on the Command line arguments the solution file that you want to automatically load.


4. Before you start debugging, it is important that you have previously registered your Guidance Package. To do that, rebuild your solution, right-click on the Guidance Package, and select Register Guidance Package. This registration takes a while, so be patient.


5. Start debugging your Guidance Package by pressing F5. Another instance of Visual Studio will open and you will be able open or create a test solution to use your Guidance Package. Now, you can use all the standard debugging features such as adding breaking points, watch window, etc.

If you have problems with step #4, e.g., you cannot see the Register Guidance Package option on the context menu, then you need to enable the Guidance Package Development on your Guidance Package solution.
  • On your Guidance Package Solution, goto the main menu, click on Tools, and then on Guidance Package Manager.
  • Select Enable / Disable Packages...
  • Select Guidance Package Development, and then click on OK, and then on Close on the next window.


After the steps above, you should be able to see the Register Guidance Package option on the context menu.

I hope this article was useful for you in helping you how to debug your Guidance Packages.

Happy Debugging!!

Thursday, July 24, 2008

Number of Microsoft Certified Professionals Worldwide

I was always curious about the number of Microsoft Certified Professionals (MCP) and just found this link from Trika's blog with the number per each MS certification:

T4 Text Templates Screencast

David Hayden has created a screencast about using T4 text templates. It is a very good introduction about the topic.

Also, check out my previous post about testing T4 templates:

Enjoy it!

Sunday, July 20, 2008

Unit Testing T4 Text Templates

Text Template Transformation Toolkit, aka T4, is a template-based code generation engine included in Visual Studio 2008 and available for Visual Studio 2005 through the Domain Specific Language (DSL) Tools and the Guidance Automation Extensions (GAX) and Guidance Automation Toolkit (GAT). Text template transformation works with a very simple formula:

TextTemplateFile + Metadata = OutputFile

A text template is a file that contains a mixture of text blocks and control logic. Metadata is provided to the text template as properties defined at its header section. When you transform a text template, the control logic combines the text blocks with the data in a model to produce an output file. Text templates can be used to create any kind of text files, such as source code files and HTML reports. This is similar to some commercial tools such as CodeSmith.

This post from Oleg Sych provides more details about T4 and it includes many links to other resources.

How to Unit Test T4 Templates?

One approach to unit test text template files is to use the Visual Studio Text Templating engine to supply the required data and run the transformation of the template. The Visual Studio Text Templating engine will allow you to see all the errors you might get when processing it.

In order to do this, you will need to install GAX/GAT and add the following references to your project:
  • Microsoft.VisualStudio.TextTemplating
  • Microsoft.Practices.RecipeFramework.VisualStudio.Library
The following sections will describe a sample text template file and a NUnit test for it using the Visual Studio Text Template engine.

The Text Template

The following code represents the template file that we will be testing:

<#@ Template Language="C#" #>
<#@ Assembly Name="System.dll" #>
<#@ Assembly name="TextTemplateTesting.dll" #>
<#@ Import Namespace="System" #>
<#@ Import Namespace="TextTemplateTesting.Data" #>
<#@ Property Processor="PropertyProcessor" Name="EntityName"#>
<#@ Property Processor="PropertyProcessor" Name="Fields" #>
using System;
using System.Collections.Generic;
using System.Text;

namespace BusinessEntities
{
public partial class <#= EntityName #>
{
public <#= EntityName #>()
{
}

<# foreach (Field field in Fields) { #>
private <#= field.Type.Name #> _<#= field.Name #>
public <#= field.Type.Name #> <#= field.Name #>
{
get { return _<#= field.Name #>; }
set { _<#= field.Name #> = value; }
}
<# } #>
}
}

This text template generates a class representing a business entity. Remember that our simple formula is TextTemplateFile + Metadata = OutputFile. The data that is necessary to generate the code is defined by the two processor properties in our template above, and they are:

<#@ Property Processor="PropertyProcessor" Name="EntityName"#>
<#@ Property Processor="PropertyProcessor" Name="Fields" #>

The EntityName processor property is a string that will represent the name of the class in the generated code. The Fields processor property is an array of Field objects representing the properties of the class in the generated code. The Field class is not shown here, but it has two properties: the name of the field and its type. You can download the entire source code from the link at the end of this article.

The Text Template NUnit Test

I am using NUnit to test the text template, but you can use any other compatible test framework. The testing code will be:

using System;
using System.CodeDom.Compiler;
using System.Collections.Generic;
using System.IO;
using System.Text;
using Microsoft.Practices.RecipeFramework.VisualStudio.Library.Templates;
using Microsoft.VisualStudio.TextTemplating;
using NUnit.Framework;
using TextTemplateTesting.Data;

namespace TextTemplateTesting.Tests
{
[TestFixture]
public class TextTemplateFixture
{
[Test]
public void TestTextTemplate()
{
// Determine the root dir of the template files.
// Since the template files are located in
// SolutionDir\Templates and the unit tests
// run inside SolutionDir\bin\debug,
// the root dir is ".\..\..\Templates"
string rootDir = Path.Combine(Directory.GetCurrentDirectory(),
@"..\..\Templates");

// Our template file expects data to be passed.
// The following dictionary will contain
// the properties to be passed to the template file.
IDictionary<string, PropertyData> arguments =
new Dictionary<string, PropertyData>();

// The first property is a string with the business entity name.
arguments["EntityName"] = new PropertyData("Customer", typeof(string));

// The second property is an array of Field objects.
Field[] fields = { new Field("CustomerName", typeof(string)),
new Field("CustomerId", typeof(int)) };
arguments["Fields"] = new PropertyData(fields, typeof(Field[]));

// Create an instance of the template host
TemplateHost host = new TemplateHost(rootDir, arguments);

// Set the template file
host.TemplateFile = Path.Combine(rootDir, "BusinessEntity.tt");
Assert.IsTrue(File.Exists(host.TemplateFile),
"Cannot find " + host.TemplateFile);

// Create an instance of the template engine.
Engine engine = new Engine();

// Transform the text template.
engine.ProcessTemplate(File.ReadAllText(host.TemplateFile), host);

// Check if there are errors.
if (host.Errors.HasErrors)
{
// Build a string with all errors
StringBuilder sb = new StringBuilder();
foreach (CompilerError error in host.Errors)
{
if (!error.IsWarning)
sb.AppendLine(error.ErrorText);
}
Assert.IsFalse(host.Errors.HasErrors,
"There are compiling errors:\n\n" + sb);
}
}
}
}

The transformation is very simple. You need basically two main objects: the host and the engine.

The first main object, the host, will contain information such as your text template file name, the data used for the transformation, and the root path where the transformation will happen. Note that text templates can also include other text templates using relative path, and they are relative to this root path defined on the host constructor.

The data is passed to the host through the arguments variable. This variable is a dictionary type where the keys are the processor property name defined in the template file, and the value is a PropertyData object specifying the value and type of the processor property.

The engine is the second main object which provides the ProcessTemplate method. This method takes a string representing the text template file, and a host object as parameters. The Errors collection of the host object will contain all errors and warnings from the transformation. The test code above only fails if there are errors, it ignores all warnings.

I hope this sample provides an useful way for unit testing your t4 files. Testing manually text templates is a time consuming activity which can be impossible to accomplish depending on the total number of templates you are using. By using automated tests you can ensure that changes in the code are not breaking your templates, increasing the confidence of your developers in their code and the confidence of your customers in your product.

Enjoy it!

Sample Code Download

You will need Visual Studio 2005 (or later), GAX/GAT and NUnit installed in order to run this sample code.

Friday, July 04, 2008

WCSF Architecture

Simon Ince has published a series of articles about the Web Client Software Factory architecture. It is a must read if you are using WCSF. The latest article can be found here, which has links to the previous ones.

Wednesday, July 02, 2008

Free data grid control for Silverlight: DevExpress AgDataGrid Suite

DevExpress announced today the availability of their new data grid control for Silverlight. They are providing it to the Silverlight developer community free of charge. Yes, it is free!! They also provide its full source code.


If you never heard about DevExpress, they develop Windows Forms and ASP.NET components, plus IDE productivity tools (CodeRush and Refactor!). I used their ASP.NET components, especially the ASPxGridView which provides superior functionality than the standard ASP.NET GridView. Now they are releasing their first Silverlight control, but providing it for free.

See the link below for more information about this free control, including registration and download. Also, check out the online demo and the video tutorials:

Friday, June 27, 2008

Aspect Oriented Programming (AOP) using AspectJ

You probably have already heard about Aspect Oriented Programming (AOP). AOP is a technique for addressing issues that cross cut objects. A cross-cutting concern is a concern across the scope of an application, it may be a constraint or simply a behavior that every class must perform.

A typical example of cross-cutting concern is logging. The logging aspect of an application is common to many classes across its multiple layers. Besides logging, other examples of cross-cutting concerns are security, caching and transaction. The following diagram, shows the multiple layers of an application (data access, business logic, services interfaces, UI), and some cross-cutting concerns (logging, security, transaction). An aspect is just another term for cross-cutting concern.


What is AspectJ?

AspectJ is one of the most popular aspect-oriented development tools for Java. It is a simple extension to the Java programming language that adds to Java the aspect-oriented programming capabilities.

Downloading and Installing AspectJ

You can download AspectJ from here. Select the latest stable release. At the time of this post, the latest stable release was AspectJ 1.6.1rc1. Just run the downloaded jar file and follow the instructions to install it. It is assumed that you have already Java installed on your machine.

Do not forget to change your PATH and CLASSPATH as suggested at the last screen of the installer application.

AspectJ Concepts and Terms

Before using AspectJ, lets define some important concepts. In AspectJ, cross-cutting concerns can be represented as a special type called aspect. This special type contains two special elements: a pointcut and an advise.

The advice is the code that is executed when an aspect is invoked. For example, if the aspect is logging, the advice will be the code that actually writes some information to a log file.

A pointcut specifies where an aspect will provide an advice, e.g. where the advice code will be executed. The places where this code can be executed are known as joint points, e.g. points within an application that may or may not invoke an advice. Thus, a pointcut binds an aspect to specific join points of the classes. Examples of join points are: when a method is called, when the object is initialized, when an exception is thrown, when a class field is assigned, etc.

Logging Example

The following code snippet represents an aspect to log all exceptions caught by the application.

import java.io.*;

public aspect ExceptionLoggingAspect {

// Specifies the calling advice when any exception is caught.
pointcut exceptionHandlerPointcut(Exception exception) :
handler (Exception) && args(exception);

// Advice declaration.
before(Exception exception) : exceptionHandlerPointcut(exception) {
// Exception logging.
String filename = "log.txt";
try {
String text = "Error: " + exception.toString() + "\n";

FileWriter out = new FileWriter(filename, true);
out.write(text);
out.flush();
out.close();
} catch (IOException ex) {
System.out.println("Failed when logging exception to " + filename);
}
}
}

In this code, the pointcut handler(Exception) binds to join points where an exception is caught, e.g. to code containing catch (Exception ...) statements. Note that this pointcut is for all types of exceptions since we are using the java.lang.Exception class. You could use an specific exception if you want to limit this aspect to be applied to certain exception types. The pointcut
args(exception) allow us to retrieve the exception object and pass it as a parameter to the advice method.

The advice method receives the reference to the exception caught and use the FileWriter class to log its details to a log file called log.txt. The advice method could also throw an exception, for example if the log file cannot be created in the file system. In this situation, an exception thrown inside the advice method will not be logged, since the advice method is not a join point. So, there is no risk of having an infinite loop.

The code above is the only code necessary for exception logging mechanism.
In a traditional approach, we would need to change all the many places where we are catching an exception and add a call to a method to log the exception. This could be a very time consuming task depending on how many places we have to change, and also resulting in duplicating code across the whole application. Using AOP, the joincut will make all the hard work to bind the joint point (catch statements) with the exception logging aspect.

Security Example

This second example is an aspect to detect malicious strings passed to method calls. Web applications are vulnerable to Cross-Site Scripting (XSS) attacks that happen when a user executes a Web page containing script code that has been injected from other sources. A malicious user can take advantage of the lack of proper data validation in data entry page. Fields could be filled with Javascript code that will be persisted in the database when the information is submitted. When this data is rendered in some Web page, the script code will be executed, causing a security flaw in the Web application.

One way to avoid XSS attacks is to validate all strings entered by users and reject those containing malicious scripts. Usually data types use standard method signature to set string fields, for example setSomeString (String text). The following code represents an aspect to validate the string parameter of all setter methods of our data types.

import java.util.regex.*;

public aspect XSSDetectionAspect {

// Specifies calling advice whenever a method from any class
// returns void and receives a string parameter.
pointcut callPointCut (String text) :
call (void *.*(String)) && args(text);

// Advice declaration.
before(String text) : callPointCut (text) {
// Using a regular expression to match valid strings, e.g.,
// containing alphanumeric characters, spaces and the following characters ,;:@().
Pattern pattern = Pattern.compile("^[0-9a-zA-Z\\s.,;:@()]*$");

Matcher matcher = pattern.matcher(text);
if (!matcher.find()) {
throw new IllegalArgumentException("Illegal string parameter: " + text);
}
}
}


In the code above, the pointcut will pickup calls from any method that returns void and accepts a string as a parameter. When a method call satisfies this condition, the advice code is executed. Note that we could restrict to pickup calls from methods belonging to classes of a specific package. For example, if we want to include only classes from com.myapp.datatypes package, we could use the following call pointcut:

call (void com.myapp.datatypes.*.*(String))

The advice method receives the string to be validated. If the string passed does not match the pattern for valid strings (e.g. alphanumeric, space, punctuation, and other characters), then an exception is thrown.

As in the previous example, the code above is everything we need for the string validation mechanism. In a traditional way, we would add validation code to all methods that set fields of string type on the data objects, resulting in duplicated code and maintenance issues.

Sample Code Download

In order to compile the sample code, you will need to install AspectJ (see section above) and then just run ajc *.java at the command prompt window.


For More Information
Tuesday, June 17, 2008

MCAD Certification and Next

I finally got the confirmation from Microsoft of my MCAD certification. I had some troubles with Prometric, the test provider, which erroneously reported that I did not show up for my 70-320 test. Ouch!
After a few emails/phone calls, having to fax my exam score report , and wait for two weeks, Microsoft confirmed my certification. Well, it is finally done!

My original plan was to get the MCAD certification done back in 2005. I passed on the first two exams (70-315 and 70-316) during that year. At that time, I started my graduation program MSc. in Information Systems at Athabasca University, and also moved from Edmonton to Mountain View - California for a new position at Intuit Inc. Well, I got pretty busy and had no time to study for the final exam, putting the MCAD on hold. In the meanwhile the new generation of MS certifications were released (MCTS and MCPD). My goal, of course, is to be certified in the new generation of certifications (MCPD: Enterprise Applications Developer 3.5), but I still want to finish what I started back in 2005, otherwise all the effort for the 2 first exams would be wasted.

What is next?

As I mentioned, I want to get the MCPD certification (MCPD: Enterprise Applications Developer 3.5). I have many choices:
  • 2 upgrade exams to MCSD, then 2 upgrade exams to MCPD Ent. App. Dev. 2.0, and finally 2 upgrade exams to MCPD Ent. App. Dev. 3.5
  • 1 upgrade exam to MCTS Web or Windows Developer 2.0, then 3 exams for .NET 2.0, and finally 2 upgrade exams to MCPD Ent. App. Dev. 3.5
  • start from the scratch and take 70-536 exam (Application Development Foundation) plus all the 5 .NET 3.5 required exams.
No matter way I decide to go, I will have to take 6 exams. So, I decided to start from the scratch. I don't like upgrade exams because they are just subset of normal exams. For example, the exam 70-559 to upgrade to MCTS Web Development .NET 2.0, includes most of the content of the 70-536 plus the content of 70-528. In this case, the content of one upgrade exam is equivalent to almost two regular exams. Also, if you are using the training kits (books) from MS Press, there is no specific book for an upgrade exam, you will need to get the book of each regular exam that it covers. And the final reason to start from the scratch is that it is much more fun to study the latest technology (.NET 3.5) then going to the previous one before.

The following figure shows the possible paths to get to MCPD Enterprise App. Dev. 3.5. The path I am taking (.NET 3.5 from the scratch) starts from 70-536 and go to 70-562 and so on (right hand side).


For more information, see:

Saturday, June 14, 2008

Moving subversion repository from one server to another

Recently I had to move one subversion repository from one server to another and it is a very simple procedure.

The first step is to dump all the information of your current repository into a file. The following command will dump the repository named reponame (located at /svn_old_path) into the file named svndump.

sudo svnadmin dump /svn_old_path/reponame > svndump

Then, copy the svndump file to the new server. I am assuming that subversion is already installed on the new server, if not, this is the guide that I followed:

https://help.ubuntu.com/community/Subversion

I setup subversion to access via WebDAV protocol with SSL encryption (https).

On the new server, I will place all subversions repositories under /home/svn. First, we need to create a new repository:

cd /home/svn
sudo svnadmin create reponame

Now, use the load command to restore all information from the dump file into the new repository:

sudo svnadmin load reponame < svndump

Since I am using subversion access through https, I need to set the proper permissions on the files. In my case, the apache user is www-data and I created a group called subversion.

sudo chown www-data reponame -R
sudo chgrp subversion reponame -R

Finally, change the subversion configuration in Apache and add the new repository. In my case, the configuration file is /etc/apache2/mods-available/dav_svn.conf, and the changes are:

<Location /svn/reponame>
DAV svn
SVNPath /home/svn/reponame/
AuthType Basic
AuthName "Subversion repository"
AuthUserFile /etc/apache2/dav_svn.passwd
Require valid-user
</Location>


Then restart apache:

sudo /etc/init.d/apache2 restart

Sunday, May 04, 2008

VMware Server on Ubuntu 8.04 - Hardy Heron

In my original post, I described how to install VMware client/server on Ubuntu 7.10. Everything was working fine until I updated my Ubuntu to Hardy Heron 8.04. It turned out that there is a patch available it. The following two posts helped me on getting VMware Server working on Hardy Heron:

Thursday, March 20, 2008

Heroes Happen {Here} in Edmonton

Last week I went to the Heroes Happen {Here} event in the Scotiabank Theatre. This event was for the launch of Windows Server 2008, Microsoft SQL Server 2008, and Microsoft Visual Studio 2008. It was presented by John Bristowe, a Developer Advisor with Microsoft Canada. The presentations were really good and we also received evaluation copies of the products above. I am glad to see this kind of events around here and looking forward for new ones.

The presentations can be found at http://www.microsoft.ca/launchresources.

And there is also the Canadian Developers' Blog.

Sunday, March 16, 2008

Migrating to Visual Studio 2008 and WCSF February 2008

We recently migrated from Visual Studio 2005 to Visual Studio 2008. We are currently working on a Web project and using the Web Client Software Factory (WCSF) which just released a new version (WCSF February 2008) supporting the new version of Visual Studio.

For migrating our existing projects, we followed the instructions from the WCSF site:
On this post, I would like to discuss a few issues we faced during this migration and the solutions we used to solve the problems.

Cannot create new project, class, or page on Visual Studio 2008: "Could not load file or assembly 'Microsoft.VisualStudio.TemplateWizardInterface, Version=9.0.0.0"


We were having
the error "Could not load file or assembly 'Microsoft.VisualStudio.TemplateWizardInterface, Version=9.0.0.0" when trying to create new project, class, or file on machines with previous installations of GAX/GAT.

For some reason, previous installations of GAX were adding some assembly redirects into devenv.exe.config. This redirect is not needed for Visual Studio 2008 final release, and if it is present it does not allow you to create new projects, new classes, pages, etc. My guess is that uninstalling previous versions will not remove this redirect entry. We didn't have this problem when installing the latest GAX/GAT/WCSF on clean machines.

So, the solution we used was to remove this redirect from devenv.exe.config.

1. Open C:\Program Files\Microsoft Visual Studio 9.0\Common7\IDE\devenv.exe.config in a text editor

2. Find this string: "Microsoft.VisualStudio.TemplateWizardInterface"

3. Comment out the element so it looks like this:

<dependentAssembly>
<!-- <assemblyIdentity
name="Microsoft.VisualStudio.TemplateWizardInterface"
publicKeyToken="b03f5f7f11d50a3a"
culture="neutral" /> -->
<bindingRedirect oldVersion="0.0.0.0-8.9.9.9"
newVersion="9.0.0.0" />
</dependentAssembly>


Cannot preview aspx pages in the Visual Studio designer

If your current aspx pages, or master page(s), contain the title tag as <title/>, then you will get an error when switching from the source view to the design view.

The page has one or more <asp;Content> controls that do not correspond with <asp:ContentPlaceHolder> controls in the Master Page.

To fix this, simply change your aspx pages, or master page(s), to use <title></title> instead.

Performance Issues When Editing ASPX/HTML pages in the Source Code Window

I noticed some lack of responsiveness when editing an aspx page on the source code window. When typing code, everything freezes and it takes a while for the intellisense to respond. Luckily, I found this post explaining the problems and pointing to a hot fix. I strongly recommend you to install this hot fix:
Using Enterprise Library 3.1 with Visual Studio 2008

The Enterprise Library 3.1 only works with Visual Studio 2005, and version 4.0 will support VS2008, but it has not being released yet. In the meanwhile, if you need use EntLib 3.1 with VS2008, then the following link provides details of how to do it:


After fixing the issues above, everything is working fine so far.

Friday, March 07, 2008

Installing VMware Player on Ubuntu 7.10 (64-bit) to Run Multiple Development Environments

My current laptop has Windows Vista Ultimate (32-bit), but I want to install Ubuntu 64-bit to be the host operating system and use VMware to run multiple virtual machines with different software development environments (Vista + Visual Studio 2008, XP + Visual Studio 2005, Ubuntu + Eclipse + LAMP, etc.). Instead of installing all different environments into the same OS, I prefer to have a dedicated virtual machine for each.

The idea is changing from a single boot Windows Vista to a dual boot Ubuntu 64-bit and Windows Vista. In Ubuntu 64-bit, I will run all virtual machines for software development. The original Windows Vista will be preserved in case I need to run a Windows application without using virtualization.


Installing Ubuntu


The first step is to install Ubuntu 7.10 (64 bits) on my laptop. Since I decided to leave my existing Windows Vista partition (drive C:) and my NTFS data partition (drive D:), I shrink my NTFS data partition in order to get some free space at the end for the Ubuntu installation. The following guide describes the whole process:

Sharing data between Ubuntu and Windows Vista with Read/Write Permissions


I want to share data between my Ubuntu and Windows Vista with read and write permissions. We have two options for it: setup read/write support for NTFS partitions on Ubuntu or setup read/write support for ext3 partitions on Windows Vista.

To setup read/write support for NTFS partitions in Ubuntu, use the following guide:If you prefer to setup read/write support for ext3 partitions in Windows Vista, then you will need to use an ext3 driver for Windows. The following driver also works for ext3 partitions:

Installing VMware Player in Ubuntu

I will be using VMware player in my laptop. I use VMware Server on my desktop where I create my the virtual machines. On my laptop, I decided to only install the VMWare Player since I just need to run the virtual machines. WMWare Player has less features than the VMWare Server, but it runs faster.

The steps for installing VMware Player on Ubuntu 7.10 (64-bit) are:

1. Install the Linux header files for your kernel version. In my case, I just run:
sudo apt-get install linux-headers-$(uname -r)-generic
2. Download the VMware Player 64-bit (tar file) from vmware.com. Or you can just run the command:
wget http://download3.vmware.com/software/vmplayer/VMware-player-
2.0.2-59824.x86_64.tar.gz
3. Extract the files to a local directory:
tar -xzvf VMware-player-2.0.2-59824.x86_64.tar.gz
4. Enter in the directory and run the installation script:
cd vmware-player-distrib
sudo ./vmware-install.pl
5. During the installation, I chose the default options by pressing ENTER. Note that when it asks the location of the kernel header files, you should provide the location where it was installed on step 1. In my case, they are in:
/lib/modules/2.6.22-14-generic/build/include
6. IMPORTANT: Since I am using a 64-bit version of Ubuntu, I also needed to install 32-bit libraries so that we can also run 32-bit virtual machines. If you do not install these libraries, you will get an "Cannot power on" error message when trying to run a 32-bit virtual machine. So, install the 32-bit libraries by running:
sudo apt-get install ia32-libs
Now you are all set. To start the VMware Player, just go to the main menu and click on Applications, System Tools, and then on VMware Player.


The Trade-offs of using Virtual Machines for Software Development


The drawback of running your software development environment on a virtual machine is that you do not have the same performance as running it on the host OS. The benefit is that it gives you much more flexibility. For example, you can have dedicated environment for specific applications your are developing, you can easily move your development environment from one computer to another, you can backup the whole development environment by just copying the virtual machine files to an external drive, etc.

Another advantage is using a 64-bit OS as host, which recognizes all the RAM you have. Windows Vista 32-bit might not be able to recognize 4 GBytes of RAM. My desktop has 4 GBytes, but Vista only sees 3 Gbytes.

Although there is a little bit of performance loss, I still prefer using development environments in virtual machines for the flexibility that it gives me.

Wednesday, February 06, 2008

Interactive Application Architecture Patterns (MVC, MVP, PAC)

I just came across this article by Derek Greer that discusses the three similar interactive application architecture patterns: the Model-View-Controller, Model-View-Presenter and Presentation-Abstraction-Control pattern. If you are interested to learn this patterns and understand their differences, this article is highly recommended for you.

The author also mentions the Microsoft Patterns & Practices Patterns MVP and MVP w/ Application Controller, which are used in the Web Client Software Factory (WCSF).

I am currently using WCSF, and I am not sure if I should use MVP with or without Application Controller. Martin Fowler describes in his P of EAA book that there is little value in using an Application Controller if the flow and navigation of your application is pretty simple so that anyone can visit any screen in pretty much any order. He also mentions that the strength of an Application Controller comes from definite rules about the order in which pages should be visited and different views depending on the state of objects.

Monday, January 28, 2008

.NET 3.5 Exams

Since Visual Studio 2008 is already available for MSDN subscribers, I am wondering when the current certifications will change due to this new release.

Currently, the MCPD certification is based on the exams related to VS2005 / .NET 2.0.
According to this blog, there are new exams for .NET 3.5. These exams are:
Each exam gives you an MCTS certification in that specific area, but there is no mention if these exams will be incorporated into the MCPD certification. Hopefully, MS announces the new changes for MCPD. For now, I will wait a little bit until this happens since I do not want to waste time studying for obsolete exams.

Sunday, January 27, 2008

Evaluating Advantages of Test Driven Development

One of the assignments of my graduation course COMP610 - Selected Topics in Software Engineering is to present a research paper on a topic covered during this course. One of the topics that I find interesting is Test Driven Development. I decided to present the following article:

Evaluating Advantages of Test Driven Development: A Controlled Experiment with Professionals

This is the first time I create a Webcast. I used CamStudio to record the presentation, which records it into AVI files. I used Windows Movie Maker to do some editing in the presentation. I am not sure if there is a better tool for that, but it worked. The output file was a WMV of 33 MB. If no editing was necessary, I could just convert the original AVI to the flash format before uploading. One tool to make this conversion is Free FLV Converter 2.3.

The presentation is only 20 minutes long, but it took a while for me to get it done. Well, now it is over and you can see it at SCIS Streaming Video Site. Enjoy it!

Spring Boot Configuration Properties Localization

Spring Boot allows to externalize application configuration by using properties files or YAML files. Spring Profiles  provide a way to segr...