Showing posts with label Tools. Show all posts

Wednesday, December 31, 2008

Robocopy error: ERROR 5 (0x00000005) Changing File Attributes

I use robocopy to backup my files to a network drive with the following command:

robocopy [source folder] [target folder] /MIR

The MIR option will create the target folder as a mirror of the source folder. The command above works pretty well when both source and target folder are NTFS file systems.

When I changed the target folder to my DNS-323 network storage, which uses a Linux file system (ext2/ext3), I started getting the following errors with the command above:
  • Although some files are virtually identical in both content and timestamp, robocopy still thinks they are different and show them as "Newer". So, whenever you run the command above, robocopy will always copy these files even if they did not change (not good for incremental backups!).
  • "ERROR 5 (0x00000005) Changing File Attributes ... Access is denied".
For the first error, you need to use the /FFT flag to assume FAT file times (2 second granularity). Although the target folder is ext2/ext3, these file systems also implement file times with 2 second granularity.

For the second error (ERROR 5), you need to turn off the attribute copying. Robocopy uses the /COPY:DAT by default, which means to copy data, attributes and timestamp. You should turn off attribute copying by explicit setting /COPY:DT.

So, the command to backup from a NTFS partition to a ext2/ext3 partition should be:

robocopy [source folder] [target folder] /MIR /COPY:DT /FFT

Monday, December 29, 2008

Upgrading to SQL Server 2008 Express and Management Studio Express 2008

In my developer machine, I have Visual Studio 2008 Professional which comes with SQL Server Express 2005. I decided to upgrade to SQL Server Express 2008 and also use the new Management Studio Express 2008.

For the 2005 versions, we have two separate installers: one for SQL Express and another one for Management Studio Express. For the 2008 version, these products are deployed in the same installer: Microsoft SQL Server 2008 Express with Tools. Lots of people are complaining that they cannot get the Management Studio installed (see discussion here), but the trick is to run the installer twice: first run to upgrade to SQL Express 2008, and the second run to add features to the current installation (Management Tools - Basic). The main steps of this installation are:

1. Download the installer from Microsoft SQL Server 2008 Express with Tools and run it.

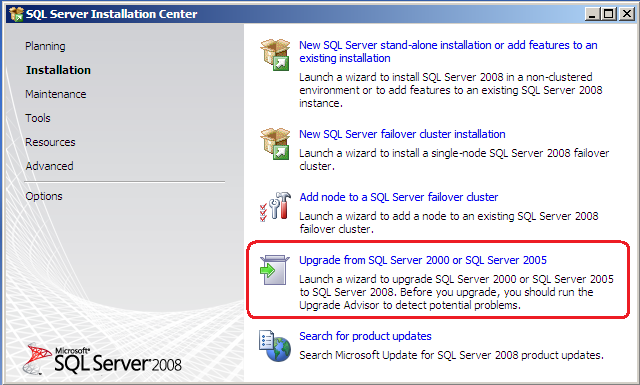
2. In the Installation screen, select Upgrade from SQL Server 2000 or SQL Server 2005, and just follow the next screens. During the upgrade, it is not possible to select new features to be added (Management Tools), so you will have to run this installer again later to add the management tools.


3. After the installation is completed, close the SQL Server Installation Center if it is still open. Then run again the same installer that you downloaded on step 1, in my case SQLEXPRWT_x86_ENU.exe.

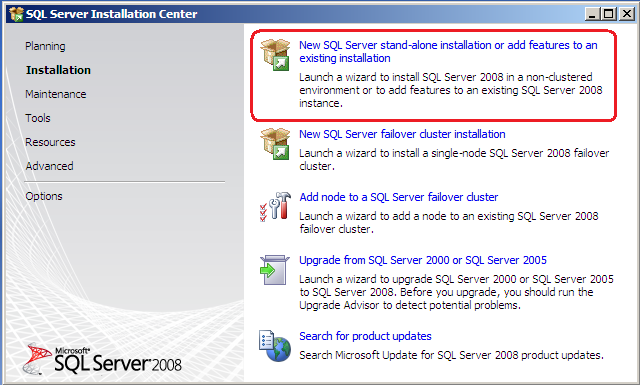
4. In the Installation screen, select New SQL Server stand-alonegrade from SQL Server 2000 or SQL Server 2005, and just follow the next screens.


5. In the SQL Server 2008 Setup - Installation Type screen, select Add features to an existing instance of SQL Server 2008, and click on Next.


6. In the SQL Server 2008 Setup - Feature Selection screen, select Management Tools - Basic, and click on Next, and just follow all the remaining screens.


When installation finishes, you will be able to access Microsoft SQL Server Management Studio from Start/Programs/Microsoft SQL Server 2008 menu, or by just running ssms.exe.

During the installation, the Setup Support Rules screen showed all the time. I understand their concern to verify that we meet all the installation requirements, but they should show this screen only if we fail in meeting some requirements, otherwise it becomes annoying.

Tuesday, December 23, 2008

Team Foundation Server Power Tools

I work on some open source projects in Codeplex (Repository Factory and Chinook Database) and I've been using Visual Studio Team Explorer to access the source code repository in their Team Foundation Server.

Although TortoiseSVN is my favorite client, and I could use it through SVNBridge, I am still insisting in using VS Team Explorer just to get used to a different tool. One of the things I miss on it is the ability to undo files that were not changed. Perforce, another source code control that I used for many years, has this feature to undo unchanged files. This feature is important so that you only check in files that you modify, thus avoiding having unchanged files in your change list that would waste time of your reviewers!! If it is a small change set, it is not a big deal to manually undo them. When I was converting some projects from VS 2005 to 2008, I had to open for edit all files before initiating the conversion, otherwise it would fail. Most of the files did not change, and it became impractical to manually undo them due to the large number of files involved.

After a few searches, I found Team Foundation Server Power Tools which consists of a set of enhancements, tools and command-line utilities that improve the Team Foundation Server user experience. It requires you to have Windows PowerShell installed. One of the tools included is the command line utility tfpt.exe which provides the following commands:


In order to undo unchanged files in your workspace, you need to use the following command:
   tfpt uu
This command will list all unchanged files and then prompt you if you really want to undo them. It worked really well for me and saved me lots of time!

Besides the tfpt.exe command line tool, Team Foundation Power Tools also includes:
  • TFS Best Practices Analyzer
  • Process Template Editor
  • Work Item Templates
  • Custom check-in policies
  • TFS Server Manager
  • TFS Users tool
  • Alert Editor

Sunday, May 04, 2008

VMware Server on Ubuntu 8.04 - Hardy Heron

In my original post, I described how to install VMware client/server on Ubuntu 7.10. Everything was working fine until I updated my Ubuntu to Hardy Heron 8.04. It turned out that there is a patch available it. The following two posts helped me on getting VMware Server working on Hardy Heron:

Friday, March 07, 2008

Installing VMware Player on Ubuntu 7.10 (64-bit) to Run Multiple Development Environments

My current laptop has Windows Vista Ultimate (32-bit), but I want to install Ubuntu 64-bit to be the host operating system and use VMware to run multiple virtual machines with different software development environments (Vista + Visual Studio 2008, XP + Visual Studio 2005, Ubuntu + Eclipse + LAMP, etc.). Instead of installing all different environments into the same OS, I prefer to have a dedicated virtual machine for each.

The idea is changing from a single boot Windows Vista to a dual boot Ubuntu 64-bit and Windows Vista. In Ubuntu 64-bit, I will run all virtual machines for software development. The original Windows Vista will be preserved in case I need to run a Windows application without using virtualization.


Installing Ubuntu


The first step is to install Ubuntu 7.10 (64 bits) on my laptop. Since I decided to leave my existing Windows Vista partition (drive C:) and my NTFS data partition (drive D:), I shrink my NTFS data partition in order to get some free space at the end for the Ubuntu installation. The following guide describes the whole process:

Sharing data between Ubuntu and Windows Vista with Read/Write Permissions


I want to share data between my Ubuntu and Windows Vista with read and write permissions. We have two options for it: setup read/write support for NTFS partitions on Ubuntu or setup read/write support for ext3 partitions on Windows Vista.

To setup read/write support for NTFS partitions in Ubuntu, use the following guide:If you prefer to setup read/write support for ext3 partitions in Windows Vista, then you will need to use an ext3 driver for Windows. The following driver also works for ext3 partitions:

Installing VMware Player in Ubuntu

I will be using VMware player in my laptop. I use VMware Server on my desktop where I create my the virtual machines. On my laptop, I decided to only install the VMWare Player since I just need to run the virtual machines. WMWare Player has less features than the VMWare Server, but it runs faster.

The steps for installing VMware Player on Ubuntu 7.10 (64-bit) are:

1. Install the Linux header files for your kernel version. In my case, I just run:
sudo apt-get install linux-headers-$(uname -r)-generic
2. Download the VMware Player 64-bit (tar file) from vmware.com. Or you can just run the command:
wget http://download3.vmware.com/software/vmplayer/VMware-player-
2.0.2-59824.x86_64.tar.gz
3. Extract the files to a local directory:
tar -xzvf VMware-player-2.0.2-59824.x86_64.tar.gz
4. Enter in the directory and run the installation script:
cd vmware-player-distrib
sudo ./vmware-install.pl
5. During the installation, I chose the default options by pressing ENTER. Note that when it asks the location of the kernel header files, you should provide the location where it was installed on step 1. In my case, they are in:
/lib/modules/2.6.22-14-generic/build/include
6. IMPORTANT: Since I am using a 64-bit version of Ubuntu, I also needed to install 32-bit libraries so that we can also run 32-bit virtual machines. If you do not install these libraries, you will get an "Cannot power on" error message when trying to run a 32-bit virtual machine. So, install the 32-bit libraries by running:
sudo apt-get install ia32-libs
Now you are all set. To start the VMware Player, just go to the main menu and click on Applications, System Tools, and then on VMware Player.


The Trade-offs of using Virtual Machines for Software Development


The drawback of running your software development environment on a virtual machine is that you do not have the same performance as running it on the host OS. The benefit is that it gives you much more flexibility. For example, you can have dedicated environment for specific applications your are developing, you can easily move your development environment from one computer to another, you can backup the whole development environment by just copying the virtual machine files to an external drive, etc.

Another advantage is using a 64-bit OS as host, which recognizes all the RAM you have. Windows Vista 32-bit might not be able to recognize 4 GBytes of RAM. My desktop has 4 GBytes, but Vista only sees 3 Gbytes.

Although there is a little bit of performance loss, I still prefer using development environments in virtual machines for the flexibility that it gives me.
Sunday, October 28, 2007

Edmonton Code Camp 2007

Last week I was at the University of Alberta attending the Edmonton Code Camp 2007.

The Code Camp is a one day developer conference driven by the local developer community. It happened on Saturday October 21. I was very impressed with the organization and quality of the presentations. I am glad that we have such an engaging .NET community in Edmonton volunteering to organize an event like this.

I attended the following sessions: Introduction to TDD, NHibernate, MonoRail, and Alt.NET.

Some technologies and tools that were presented through these sessions:
  • Rhino Mocks: a dynamic mock object framework.
  • Windsor Container: Inversion of control container.
  • ActiveWriter: an addin for Visual Studio 2005 to design a domain model and to generate code decorated with ActiveRecord attributes.
Some recommended books:

Tool for C# Format

I am using this tool for formating C# code for publishing in a blog:

http://manoli.net/csharpformat/

The formatted code will look like:


using System;

public class HelloWorld
{
public static void Main()
{
// Comment line
Console.WriteLine("Hello World!");
}
}

Friday, September 21, 2007

Creating a new virtual machine for VMWare Player

VMware Player does not allow you to create a virtual machine from the scratch, only to run existing ones. In order to create new virtual machines, you can use the qemu-img.exe program that comes with QEMU.

The virtual machine consists of two files: the vmdk which you create using the qemu-img.exe program, and the vmx file which is a plain text configuration file.

The following post contains instructions of how to create these files:
http://johnbokma.com/mexit/2005/10/26/vmware-player-windows-xp.html

In his example, the author uses the guest Operating System as Windows XP. To create a virtual machine for different operating systems, simply change the value of the guestOS variable located at the vmx file. The following link contains the supported values:
http://www.ffnn.nl/pages/articles/linux/vmware-player-image-creation.php#oscodes

Thursday, August 23, 2007

Essential Tools for .NET Development

Read the complete post at: http://shailensukul.blogspot.com/2007/07/essential-tools-for-net-development.html.

I would also add to this list:

Patterns & Practices: Software Factories
http://msdn2.microsoft.com/en-us/practices/bb190387.aspx

Code Analysis/Unit Testing
Resharper

Continuous Build
Cruise Control .NET

Source Control
Subversion
TortoiseSVN (Subversion client - Windows Shell Extension)
AnkhSVN (Subversion client - Visual Studio Plugin)

Wednesday, August 01, 2007

Online Backup

I found this online backup service called Mozy. It works pretty well, and it is free!! The free version offers up to 2 GB, and you can backup more than one computer. If you need more than 2GB, their unlimited version costs $4.95 / month.

For each person you refer, you can have 256MB more. So, if you want to try it, just click here, or goto their website www.mozy.com and use my referral code: SW5GZF.

Enjoy it!

Spring Boot Configuration Properties Localization

Spring Boot allows to externalize application configuration by using properties files or YAML files. Spring Profiles  provide a way to segr...